
I bought some kits, and have spent the last couple of weeks putting them together.
Model Tech Studios Crane
There will be a scrapyard on the layout, and I needed a way for workers to get scrap metal from ground to rail car, and a small crane seemed to be the ticket. A search for for a pre-assembled model of the right size was fruitless, but I found a kit that looked right. The $30 price (for a kit!) was somewhat off-putting, but there wasn’t anything else that would work.
I was expecting something along the lines of the airplane, car, and ship kits I’d built as a boy: some molded structural parts with some detail items. I was not expecting what I got:

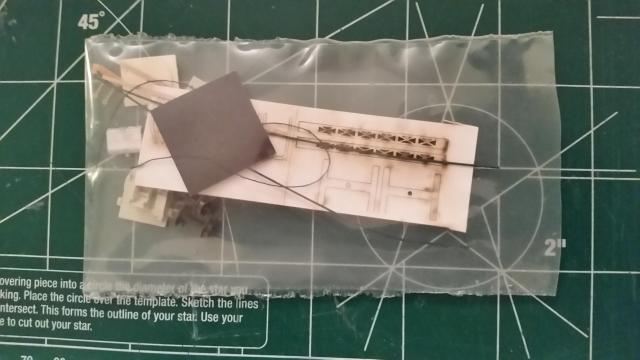
The only molded piece is the platform with the engine and cable drum, everything else is . . . material. The instruction promise ‘Lots of images’, which is true. ‘Lots of images’ doesn’t include an isometric exploded view with the parts labeled. Most of the kit parts are laser-cut wood, a few molded pieces, and some wire and thread. I don’t know if this is a ‘craftsman’ kit or not, but this was a bit more assembly than I was expecting.
After going through the instructions a few times, I organized the material. I noticed there wasn’t an operator’s station on the crane, which seems a significant oversight. I built a seat out of some 0.30 styrene and control levers with 0.5 mm rod.

This is almost impossible to see on the completed model, but now the workers can actually use the machine.
Assembly actually isn’t too bad, but like everything N-scale, it’s a bit fiddly. Wire has to be formed for the side braces, and that takes some patience. I used CA throughout.
Platform and roof supports.

Attaching the eyes to the braces.

The boom consists of two pieces of laser-cut wood. The problem is that the boom requires four pieces to complete. I used 0.30 styrene to form the other two sides, but for $30, I can reasonably expect that all the pieces required to complete the kit should be included.
I made some changes to the original kit:
- Because the crane will be in a fixed location, I omitted the wheels and used styrene to enclose the open ends of the base.
- I used carpet thread rather than the supplied sewing thread for the cable, because to my eye the carpet thread is smoother and looks more like cable.
- The crane will be located in a scrapyard, so I substituted an electromagnet for the supplied hook. The magnet is made of a section of 10 mm dowel left over from the girder bridge piers. I used spackle to fill in imperfections, then painted and weathered it.
The kit builds up to a decent model:

I painted everything flat black, then weathered with powdered pastels and Rust paint. I chose to keep the wooden canopy frame unpainted for contrast

Overall I’m OK with the kit. It fills a need on the layout, and will look good in the scrapyard. I do have some beefs:
- For $30, I’d like for everything required to complete the kit to be included.
- There really needs to be an exploded view drawing.
I appreciate that the crane will add to the scrapyard scene, and this is the first kit of this type I’ve built, but it took a week of modeling time (and several basketball and football games) to build it. Presumably future kits will go faster.
Paw-of-Bear Pallet Kit
I needed some pallets and skids for the team track and warehouses. Ready-made pallets are available, but kits are cheaper. Among the kit selections, the one made by Paw-of-Bear appeared to have the highest yield for the price, and it has gotten good reviews.
The kit consists of laser-cut wood for the pallet faces, and some strip wood for the stringers:

The kit builds a number of pallets of varying sizes, and the instructions are complete. No exploded-view drawing, but these are pallets. The idea is to cut each pallet sheet in half, glue the stringers along the guidelines, then face the pallets with the other half of the sheet.
I glued the stringers with CA, using a couple of drops per stringer per pallet. After the glue dried, I faced the pallets:

The instruction recommend using a hobby knife or single-edge razor blade to cut the pallets apart and trim them. I found this to be somewhat problematical, so I turned to The Chopper to cut the pallets. I found that the minimal amount of glue I’d used was insufficient to cope with the mechanical stresses, and had to scrap a number of pallets. After that experience, I re-glued all of the stringers with glue running the full length of the stringer. This worked much better.

Yield was about 60% of kit design, but that’s entirely due to operator error. The kit provides good looking, scale-size pallets and skids. I believe I have enough for my needs, but if I need more, I’ll order the same kit.
Shapeways Bumper Posts
There are a few sidings on the railroad that require bumper posts. Research on Northern Pacific bumper posts failed to turn up any definitive design, I decided to use the standard Hayes-style, and went to the Shapeways site to see what was available.
Shapeways is a 3D printing marketplace, and people can buy what’s on offer. or upload and sell their own designs. The site search engine could use some refinement, as specific queries can yield thousands of results, not all of them especially relevant. In this case I found a lot of 20 posts for $6. I believe with shipping and handling the total price was around $10. A couple of days later I had my posts:

Not exactly what I was expecting, but an efficient use of space and material. The designer included creases on the sprues, so the posts are easy to remove, They’re also easy to break. I lost one, but more inventory for the scrapyard.
I painted the posts flat black, smeared on some Rust, then dusted with pastel chalk. Installation is a matter of gluing the post in place:

Cheap, looks good, and does the job.

You must be logged in to post a comment.